

Frustrated with GA4? You aren’t alone.
Google Analytics is a powerful tool that business owners and marketers rely on to analyze how visitors interact with their websites. Now that the switch has been flipped from Universal Analytics to Google Analytics 4, many people feel unprepared, frustrated, and confused. If you are one of these people, you aren’t alone. Thousands of webmasters and business owners are trying to master Google’s new analytics platform to ensure they don’t lose data and valuable user insights.
The Beginner’s Guide to GA4: Frequently Asked Questions
Although GA4 is a robust and complex tool, one article won’t be enough to get you comfortable using it. Other websites and agencies try to build a “comprehensive guide” that covers everything you need to know about GA4. However, we’ve found that articles in this format can be overwhelming and cause more harm than good. Sometimes, it’s best to start simple and build a foundation to build upon. That’s why the Evolve Systems team has compiled a list of frequently asked questions that should act as a good starting point as you begin to grasp GA4.
If you want more context about Google Analytics 4, why it’s necessary, and what makes it different than Universal Analytics, check out our first blog article about these topics.
How do I create and set up a GA4 property?
Firstly, if you don’t have a GA4 account, you’ll need to create one before setting up your GA4 property. Thankfully, creating a GA4 account is easy:
- Visit analytics.google.com and sign in to a gmail account you want tied to Google Analytics.
- Navigate to the admin panel (gear icon in the bottom left) inside any GA4 account.
- Click the blue Create Account button at the top of the Account column.
- Enter a descriptive name for the account and click Next.
Once your account is created, it’s time to create a property. Enter a name for the property, fill in the required information, and proceed through the setup steps. If you already had a Google Analytics account before starting, then the steps to create a new property are a little different:
- Navigate to the admin panel (gear icon in the bottom left) inside your GA4 account.
- Click the blue Create Property button at the top of the Property column.
- Enter a name for the property and proceed through the setup steps.
After you create an account and property, the next step is to create a data stream. A data stream is a flow of data from a customer touchpoint to GA4. If a client has an iOS app, an Android app, and a website, a data stream should be created for each. Data streams collect data independently from other data streams within the same property. They also each have a unique Measurement ID (in the format G-XXXXXXXXXX). If you follow the steps above, Google Analytics should prompt you to create a data stream under the Data collection step of the setup process. Choose Web and copy the Measurement ID. You’ll need it to add GA4 to your website.
How do I install GA4 on my website?
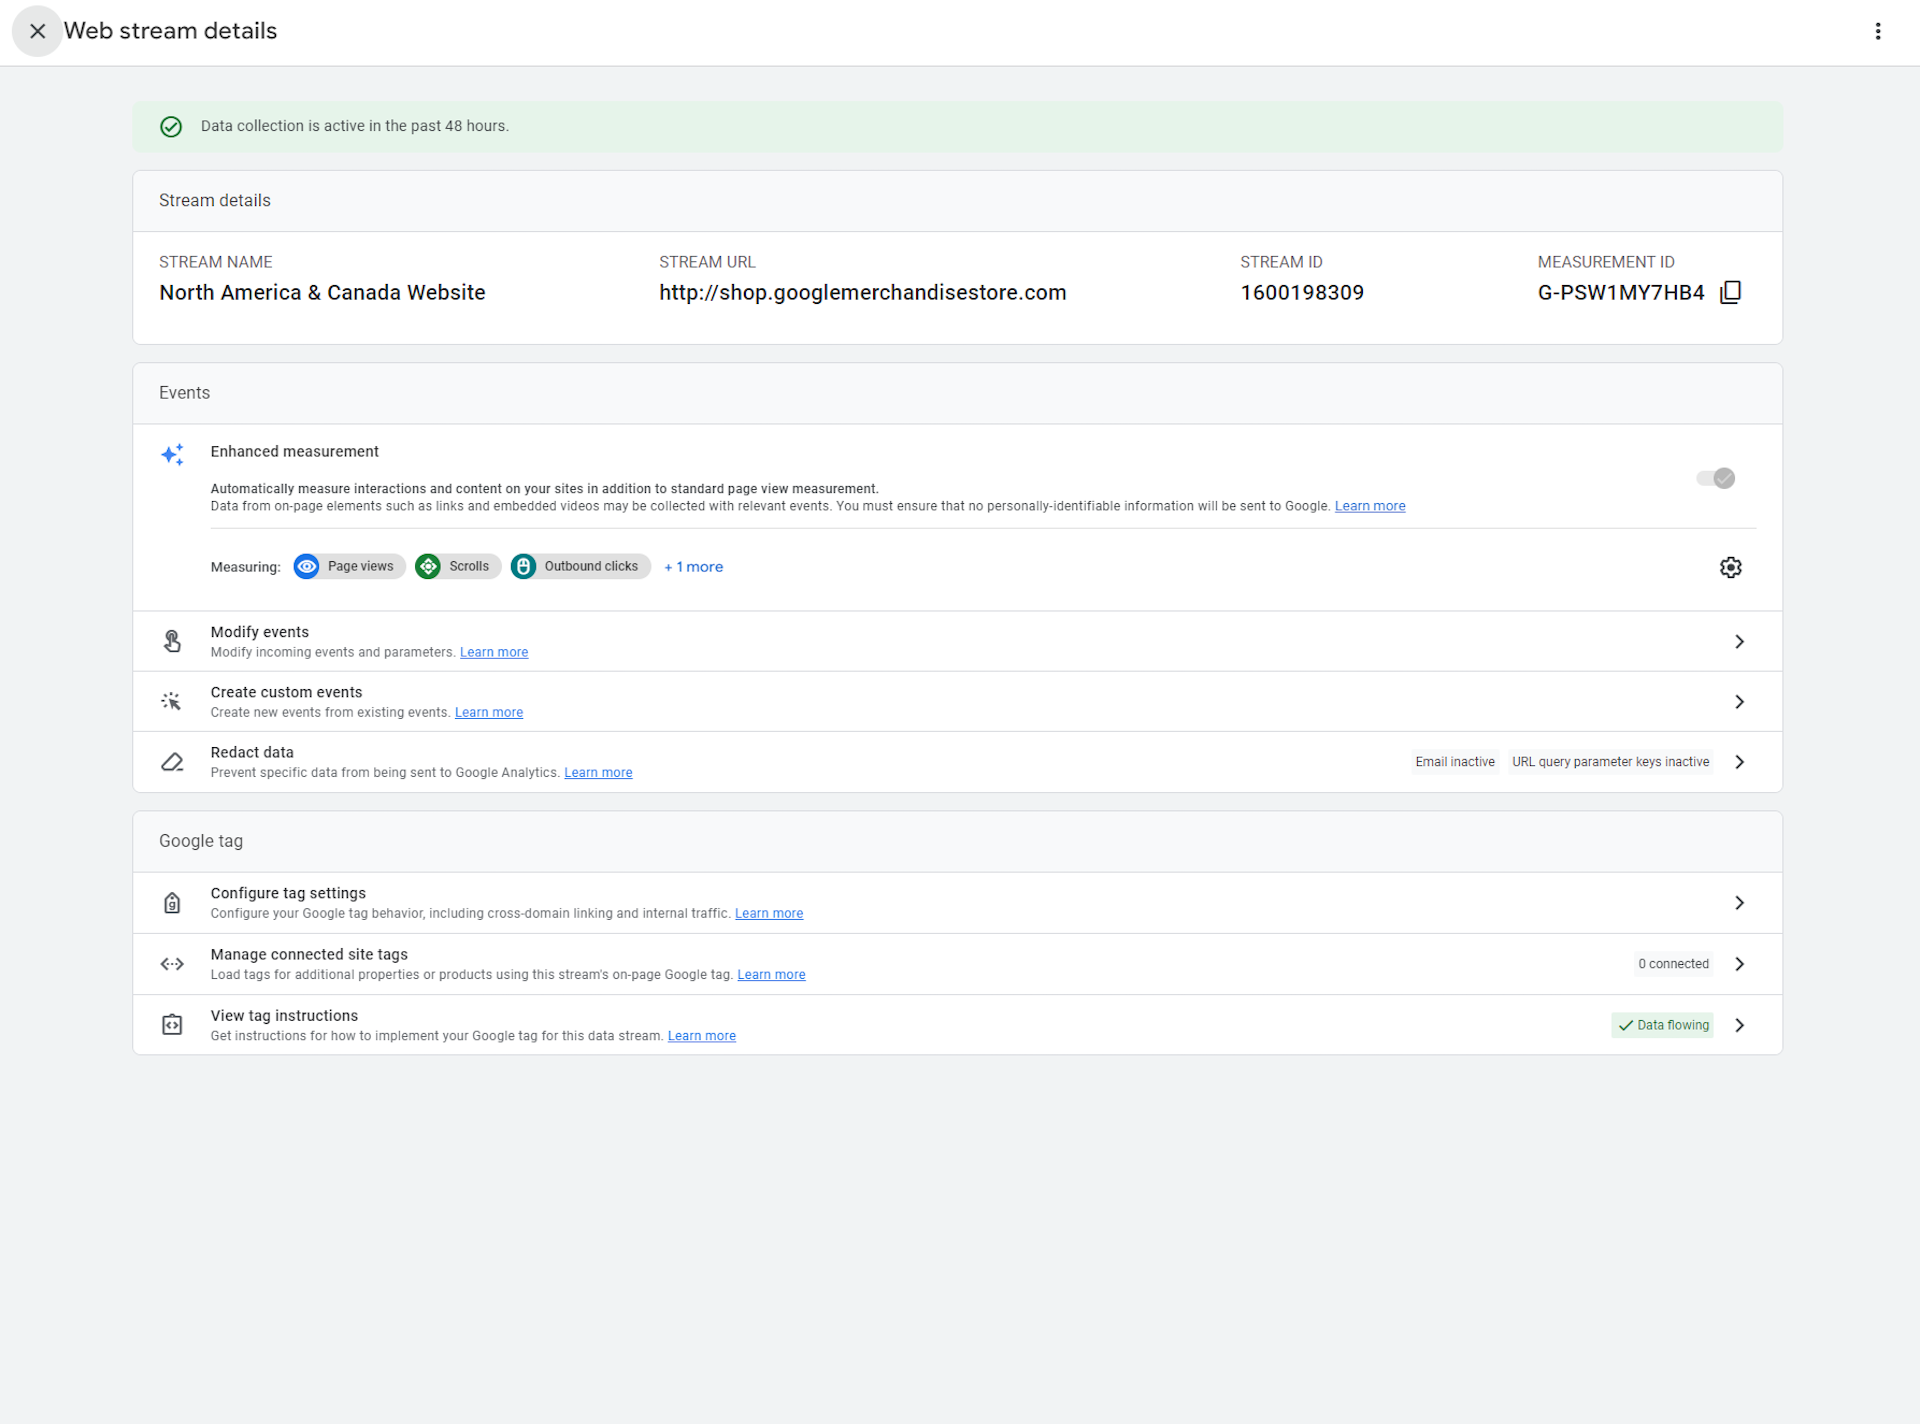
There are multiple ways to install GA4 on your website. You can see all the options available by navigating to the data stream you want added to your website. Then, select View tag instructions at the bottom of the web stream details window. There, we can see some possible ways to install the Google tag:
- Install manually: Copy the snippet provided to you and paste it into the code of every page of your website immediately after the <head> element. Since this option requires some technical knowledge, it might be best to get your developer to do this for you or try a different option.
- Install with a plugin, theme, or website builder tool: If your site uses WordPress, Wix, Squarespace, or a similar platform, there are tools to help install your Google tag without changing your code. Some WordPress themes have a spot in the theme options for you to paste the measurement ID. Similarly, plugins like Google Site Kit, MonsterInsights, or WooCommerce make it easy to install GA4, requiring nothing more than your measurement ID.
- Install with Google Tag Manager (GTM): This option provides the most customizability and utility, including the ability to create custom events and advanced tracking functionality. When working with our clients, this is the option we use to install GA4 into their website. If you have some experience with GTM, we recommend configuring GA4 in your GTM container and then inserting your GTM snippet into your website’s code. Since GTM is an entirely different tool than GA4, we can’t dive into the specifics here. However, if you reach out to our team looking for more information about GTM, we’re happy to help. In the meantime, you can read this GTM support article created by the Google team.
Do I need Google Tag Manager with GA4?
The short answer is no; you don’t need Google Tag Manager. GA4 is a standalone tool that can operate on its own. With that being said, you will miss out on some customizability by not using GTM, such as creating custom events, dimensions, and metrics. Ultimately, your decision depends on the level of detail you need when analyzing your website. Everybody’s GA4 setup is different, and a “right answer” doesn’t exist!
How do I find my GA4 measurement ID?
You can find your GA4 measurement ID in your web data stream in the format G-XXXXXXXXXX. Here’s how to navigate to your data stream:
- Navigate to the admin panel (gear icon in the bottom left) inside your GA4 account.
- Select Data Streams in the Property column.
- Click on your web data stream to pull up web stream details.
- Copy the measurement ID by clicking the icon next to the ID.

How do I check if GA4 is installed correctly on my website?
You can ensure that your Google tag is properly installed on your website by checking two things. First, navigate to the web stream details with the measurement ID you placed on your website by following the steps we mentioned to find your measurement ID (above). You should see a green bar across the top of the web data stream details view with a checkmark and the message Data collection is active in the past 48 hours. You should also see a green box at the bottom of this view with a checkmark and the message Data flowing. An important note is that it could take 24 hours or longer for GA4 to provide feedback on tag activity, so be patient! If you don’t see these messages, come back the next day and check again before troubleshooting.
The second thing to check is the Realtime report. This report displays the activity on your website during the last 30 minutes. If the Google tag is correctly installed, you should see activity in this report. Navigate to the Realtime report by selecting the Reports tab on the left in your GA4 dashboard.

How do I see page views in GA4?
Pageviews in GA4 are a little different than in Universal Analytics. They are events called page_view that appear alongside other events in your reports. Keep in mind that GA4 will include page_view events in every event-related report. For example, if users triggered 10,000 events on your website last month, half or even more could be page views. This is an important aspect to consider when measuring engagement for your website. You can see page views in multiple places, but the following two spots are the most convenient.
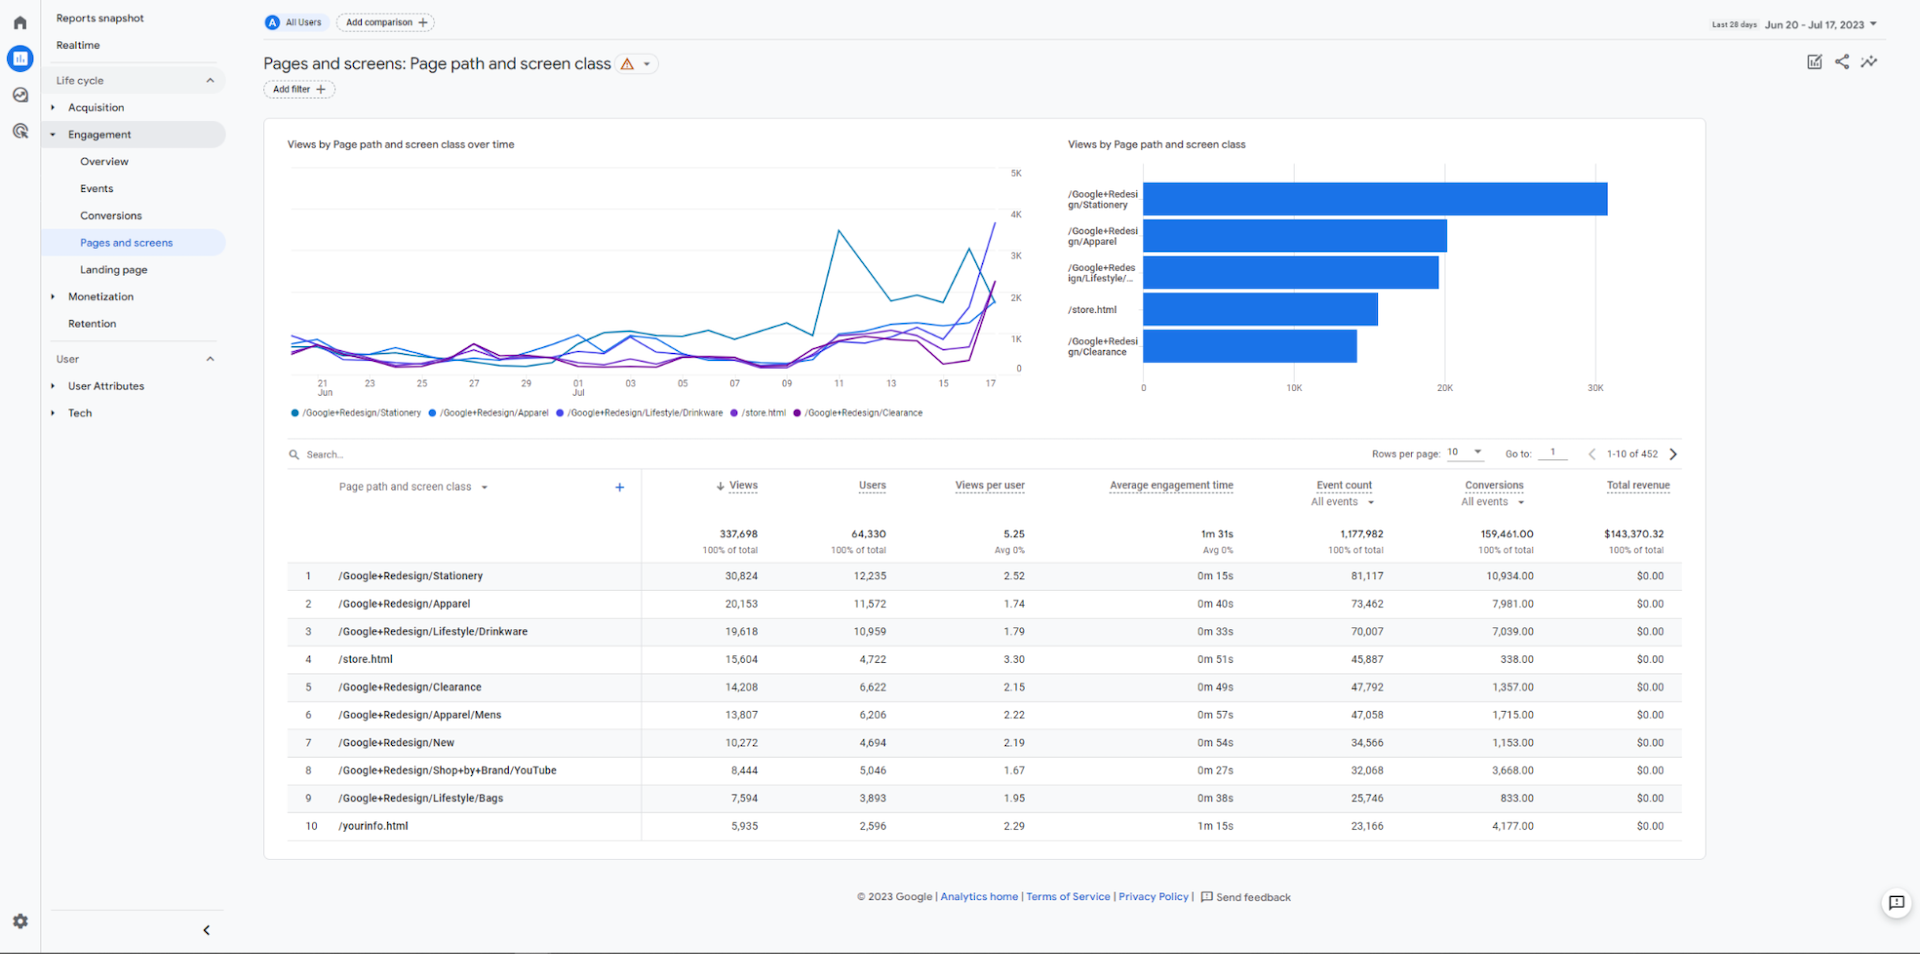
Page and screens Report
You can find this report by navigating Reports → Engagement → Pages and screens. The column labeled Views is the total amount of page_view events and screen_view events. The event called screen_view applies to apps only, so if you aren’t managing an app, the Views column should only be comprised of page_view events. This report is also handy to see which pages on your website received the most views, as well as how users are interacting with your web pages.
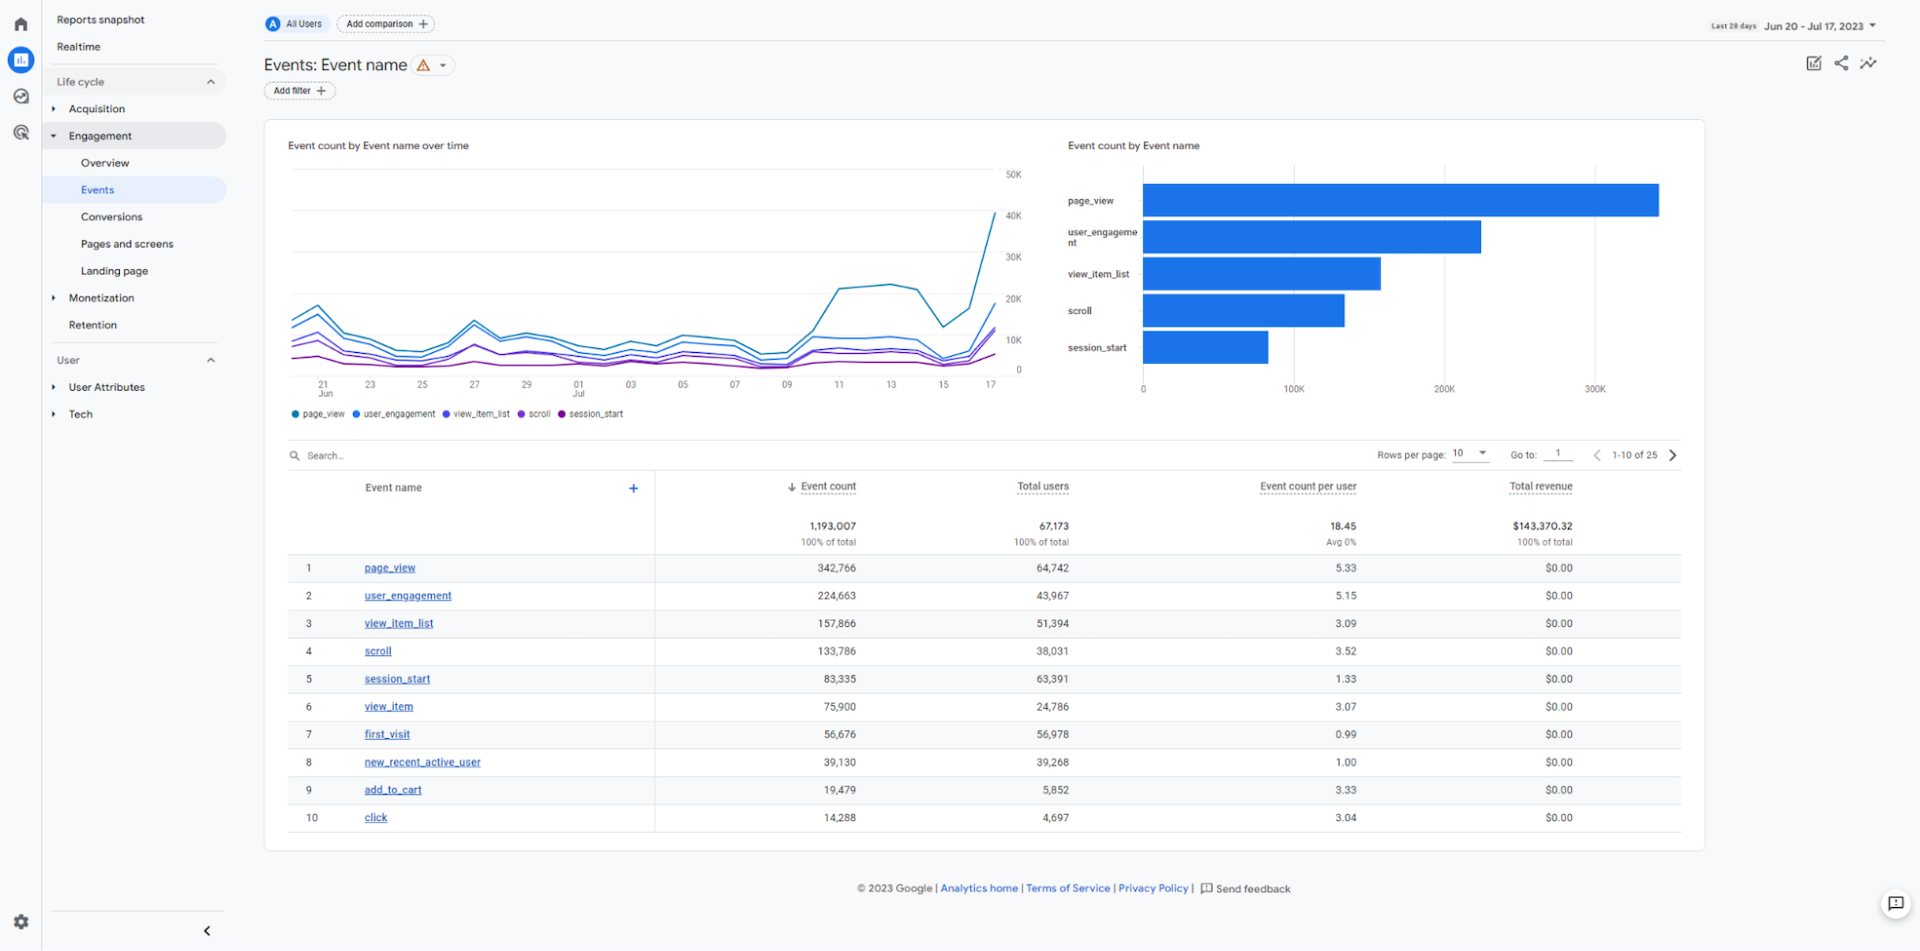
Events Report
You can find this report by navigating Reports → Engagement → Events. Here, you should see an event in the Event name column called page_view. The Event count column shows how often this event was triggered, which is basically a count of how many page views there were.
How do I set up goals and conversions in GA4?
Although goals are a thing of the past, conversions are an important part of GA4. Conversions have replaced goals and must be configured after you set up your GA4 property. By default, only the purchase event is considered a conversion, so if you have other events you want to be tracked as conversions, you’ll have to do some configuring. The good news is that this is a relatively simple process.
The first thing to do before converting events into conversions is to ensure that the events are set up correctly and are active on your website. Navigate to the admin panel (gear icon in the bottom left) inside your GA4 account, and select Events in the Property column. Here, we can see the complete list of events that users triggered while on your website during the given date range in the top-right corner. Once you find the event you want to turn into a conversion, simply toggle the Mark as conversion switch in the right-most column. Confirm that this event was turned into a conversion by navigating to the Conversions section of the Property column (right below Events). If you see the correct events here, then you’re done!
Sometimes, we want to preemptively label an event a conversion before the event starts showing up in GA4. To do this, navigate to the Conversions section and click the New conversion event button in the top-right corner. Here, you can enter the name of your future event that should be tracked as a conversion. If you decide to take this route, there are two important things to consider:
- You have to create the event, either through tag management tools like Google Tag Manager or inside GA4.
- The name you enter must exactly match the name of the event you created.
What’s Next for Google Analytics 4
Even though Google released GA4 in 2020, many marketers and business owners have only had exposure to the platform for a year or less. When Universal Analytics properties stopped collecting data in July 2023, people scrambled to plug the holes that were revealed once the switch to GA4 was official. Whether you like the new platform or not, GA4 is here to stay for the foreseeable future. If you’re one of the people who can’t stand the new Google Analytics, the good news is that Google is actively revising and improving it based on user feedback. New features, better platform performance, and a refined user interface are most likely on the horizon, although we don’t know when or how frequently these improvements will arrive.
In the meantime, we hope that this Q&A-style guide helps you get a grasp on GA4. Building confidence and experience in GA4 takes time, and this guide is simply a starting point for you to use as a reference. Despite a rocky release, GA4 has a lot of potential and can be a very powerful tool for you while simultaneously respecting user privacy and the evolving digital marketing landscape.
How Evolve Systems Can Help
If you’re feeling overwhelmed and want to fast-track your GA4 implementation, Evolve Systems has the technical expertise to not only build a GA4 roadmap that aligns with your business goals but also educate you along the way. Our team has multiple years of experience with GA4, and we’ve built GA4 properties that are perfectly customized to the needs of our clients. If this interests you, reach out to us and tell us about your website. We’ll help you build a plan that removes any uncertainty surrounding tracking and analytics.